
Wall Finish Lines
Overview
Section titled “Overview”The Wall Finish Lines tool bridges the persistent drafting gap between your interactive 3D BIM models and traditional 2D Finish Plans (at 1:50 or 1:100 scale). Instead of wasting hours drafting manual detail lines inside every room to represent paint coatings, tile layout perimeters, or acoustics wall fabrics, this tool evaluates the actual 3D materials applied to your walls and instantiates accurate 2D presentation geometry automatically.
Designed to tolerate real-world architectural complexities, the tool features a robust rule-based mapping engine, an automated graphic color algorithm, and intelligent extensible storage tracking. Because Wall Finish Lines registers a background monitor inside Revit, your drafted presentation lines remain persistently aware of their hosting walls—dynamically healing and reshaping themselves whenever room boundaries shift or floor plans evolve.
Interface Breakdown
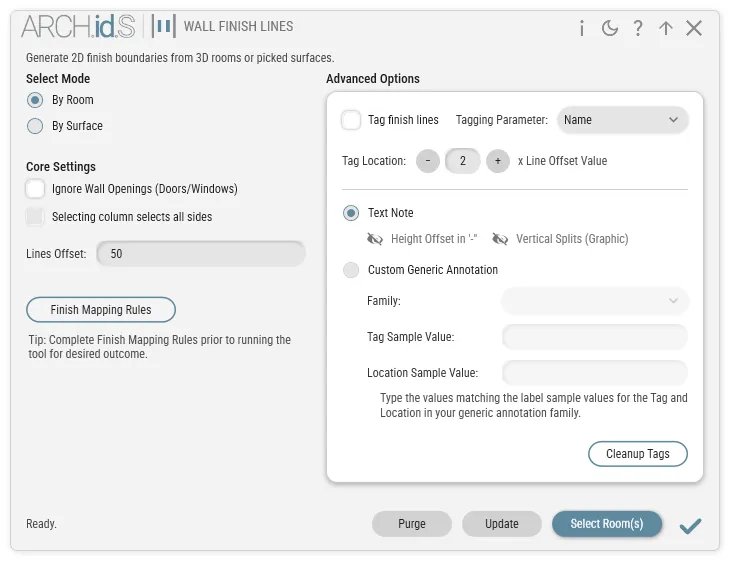
Section titled “Interface Breakdown”1. Selection & Generation Modes
Section titled “1. Selection & Generation Modes”- Room Mode: Click inside any Revit Room to automatically trace all enclosing walls. The geometry engine evaluates the physical perimeter, filters out internal core assemblies, and generates continuous finish lines for the entire room space instantly.
- Face Mode: Select individual wall faces or Revit Parts to generate isolated runs. This mode is ideal for detailing partial feature walls, restroom vanity backsplashes, or height-specific wainscoting installations.
2. Advanced Geometry & Room Island Options
Section titled “2. Advanced Geometry & Room Island Options”Fine-tune exactly how presentation lines offset from wall substrates and interact with complex room layouts.
- Line Offset: Establish a precise visual clearance offset (such as 25mm or 50mm) away from the wall face, guaranteeing that delicate finish lines print crisply over heavy structural architectural wall boundaries on sheets.
- Stacked Finishes (Side-by-Side Drafting): When walls feature vertically stacked materials (e.g., stone tile along the lower base and eggshell paint on the upper wall), the tool identifies multiple finishes sharing the exact same footprint. It automatically offsets secondary materials further into the room so every vertical layer reads clearly side-by-side on flat floor plans.
- Wrap Columns & Room Islands: Utilizing real-world geometric spatial sampling (
IsPointInRoom), the engine doesn’t just trace simple outer perimeter squares! It accurately identifies freestanding structural columns, internal shafts, and architectural kitchen islands located inside the room boundary, drafting seamless interior finish loops around every exposed face. - Ignore Wall Openings: By default, finish lines cleanly cut back and terminate at door frames and glazing openings. Checking this option overrides cutbacks, driving continuous presentation lines uninterrupted past doorways and interior archways.
3. Finish Mapping Rules
Section titled “3. Finish Mapping Rules”This dashboard serves as the translation matrix between your 3D BIM materials and standard 2D office drafting conventions.
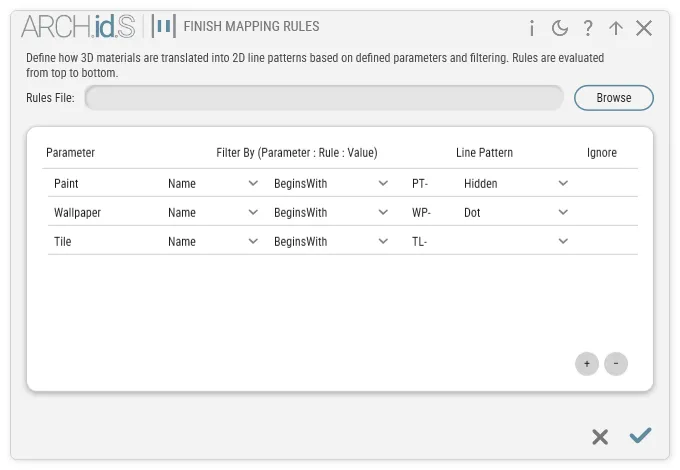
- Intelligent Parameter Filtering: Establish flexible rules targeting specific material parameters (such as Material Name, Class, or Custom Properties) utilizing conditional expressions like Begins With, Contains, or Equals.
- Example Workflow: Configure rules to generate finish lines strictly when material names begin with
PT-(Paint) orTL-(Tile). The tool will intelligently pass over and ignore substrate layers like CMU block, plywood, or drywall framing.
- Example Workflow: Configure rules to generate finish lines strictly when material names begin with
- Line Pattern Assignments: Bind explicit Revit Line Patterns to corresponding material classes (e.g., Paint = Solid Line, Acoustical Fabric = Dot Pattern, Tile = Dash).
- Auto-Color Generation: Stop manually picking RGB colors for endless material lists! The tool houses an algorithmic color generator that processes your material names through a hashing function multiplied by the Golden Angle (137.5°). This mathematically guarantees distinctive, high-contrast visual color differentiation for every finish across your project automatically.
4. Smart Tagging & BIM Parameter Sync
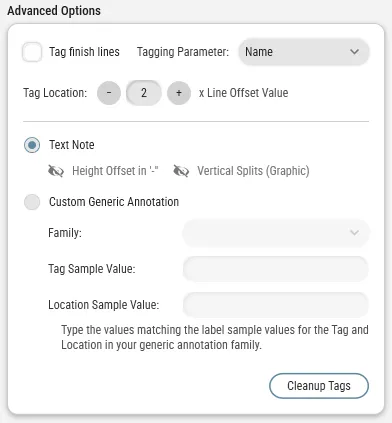
Section titled “4. Smart Tagging & BIM Parameter Sync”- Automated Tag Placement: Deploy finish tags precisely anchored along the visual center of every generated line segment.
- Tag Family Selection: Deploy simple Revit Text Notes or link directly to custom architectural Generic Annotation families loaded in your project.
- Vertical Location Indicators: Enable this specialized toggle to inject vertical placement identifiers (such as
"TL-01 (Base)"versus"PT-02 (Upper)") straight into tags whenever stacked wall finishes are detected. - BIM Parameter Syncing: Write captured 3D Material specifications directly into the generated 2D Detail Line’s native
CommentsorMarkfields, enabling effortless scheduling and filtering.
5. Action Bar Management
Section titled “5. Action Bar Management”- Update Room/Face: Because generated lines embed invisible tracking identifiers, selecting a modified room and clicking Update cleanly removes legacy lines and recalculates fresh geometry based on your latest architectural wall adjustments without creating overlapping duplicates.
- Purge: Select any completed space to instantly strip all generated finish lines and associated tags in a single action.
💡 Architect’s Tips & Behavior Guide
Section titled “💡 Architect’s Tips & Behavior Guide”- Real-World Over Revit Semantics: Wall Finish Lines refuses to get fooled by incorrect or unassigned Revit
RoomBoundingcheckboxes. It actively uses pure physical geometry bounding intersections to locate real walls and partitions in 3D space, ensuring your presentation plans always represent physical reality. - Self-Healing Collinear Geometry: When walls are split into multiple micro-surfaces (such as using Revit’s Split Face tool or intersecting partition join lines), traditional detailing scripts produce fragmented, overlapping lines. Our built-in Collinear Merging engine welds touching, parallel segments back into a single continuous presentation line before tagging!
- Precision Tag Collision & Orthogonal Leaders:
- True Anchoring: Every tag roots firmly to the exact midpoint of its own finish line—not artificially grouped or offset to arbitrary reference points.
- Orthogonal Standards: Because tags generate from line midpoints, their leader wires consistently deploy as sharp, orthogonal (straight horizontal or vertical) architectural drafts.
- Intelligent Collision Engine: When dealing with closely stacked finishes (e.g., 5mm line vs 10mm line), standard text boxes inevitably clash. Our collision engine dynamically glides overlapping tags smoothly down their respective line segments until text clearances settle safely apart—without ever sliding past physical line endpoints!
- Live Background Self-Healing: Powered by an active background Revit
IUpdater, moving an interior partition or nudging a corridor boundary causes your existing 2D finish lines to instantly reshape, stretch, and heal themselves alongside your walls without requiring manual realignment clicks. - Global Studio Standardization: Export your finalized Finish Mapping Rules to an external network
.jsonfile. Sharing this configuration path ensures every team member across your office publishes sheets with identical visual line weights, colors, and finish symbols. - Automated Object Style Subcategories: Whenever a new material finish generates a line, the tool creates a neatly structured subcategory under
OST_Lines(such asFINISH_PT-01). This empowers you to execute master overrides for line weights, colors, or overrides directly through Revit’s native Visibility/Graphics dialog!